Understanding the Exposure Triangle
Getting the right exposure is one of the most important parts of photography. Whether you're using a smartphone, compact camera, bridge camera or DSLR, understanding how light affects your images can give you much more control over the final result.
The good news is that you don't need to memorise hundreds of complicated camera settings. Start with a few simple principles, learn how they work together, and you'll soon be able to make better decisions in almost any lighting condition.
The Exposure Triangle
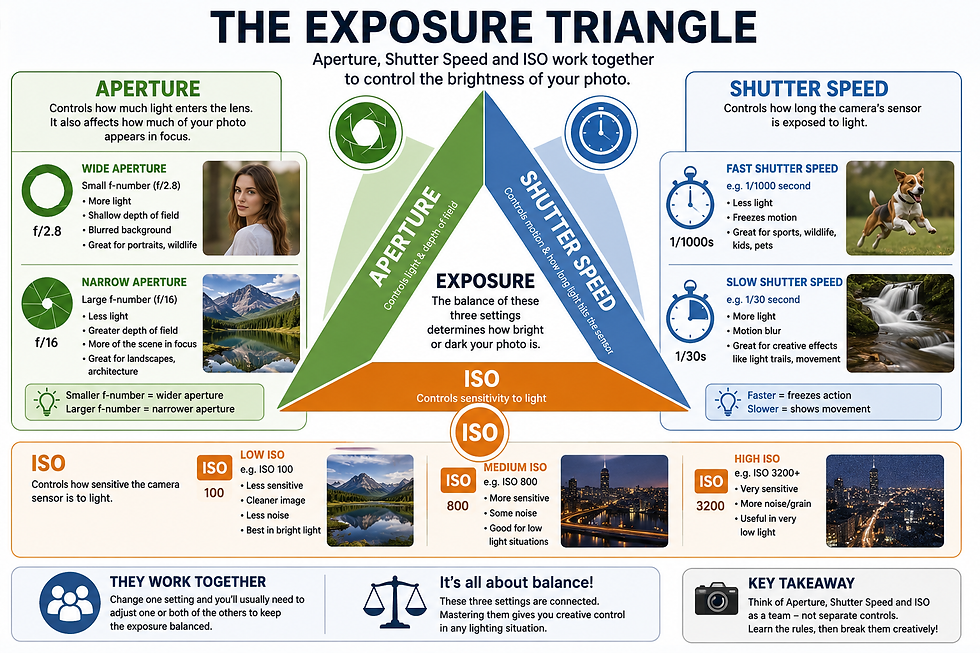
The Exposure Triangle is made up of three key camera settings: Aperture, Shutter Speed and ISO.
These three controls work together to determine how bright or dark your photograph will be. Changing one usually means you need to consider adjusting another.
Aperture – Controlling Light and Depth of Field
Aperture controls how much light enters through the lens. It also has a major effect on how much of your photograph appears in focus.
A wide aperture, such as f/2.8, lets in more light and can create a beautifully blurred background. This is particularly useful for portraits, wildlife and subjects where you want to separate the main subject from its surroundings.
A narrow aperture, such as f/16, lets in less light but gives you greater depth of field, meaning more of the scene can appear sharp. This can be useful for landscapes and architectural photography.
One of the confusing things about aperture is that the numbers work backwards: a smaller f-number means a wider aperture, while a larger f-number means a narrower aperture.
Shutter Speed – Controlling Motion
Shutter speed determines how long your camera's sensor is exposed to light.
A fast shutter speed, such as 1/1000 second, can freeze fast-moving subjects. This makes it useful for sports, wildlife, children, pets and other action photography.
A slower shutter speed, such as 1/30 second, allows more light into the camera but can introduce motion blur. This isn't necessarily a problem. In fact, deliberately using a slow shutter speed can create interesting effects such as light trails and intentional movement.
ISO – Controlling Sensitivity
ISO controls how sensitive the camera is to available light.
A low ISO, such as ISO 100, generally produces a cleaner image with less digital noise. It's ideal when plenty of light is available.
When the light levels fall, increasing ISO can help you maintain a usable shutter speed or aperture. However, very high ISO settings can introduce more noise or grain into your photographs.
The key is to think of these three settings as a team rather than treating them as completely separate controls.
The Sunny 16 Rule
Before modern cameras had sophisticated light meters, photographers used simple exposure rules to help estimate the correct settings.
One of the best-known is the Sunny 16 Rule.
On a bright, sunny day, a traditional starting point is:
f/16, ISO 100 and approximately 1/100 second.
The idea isn't that these settings are compulsory. Instead, they provide a useful starting point that you can adjust depending on the conditions.
For example:
Bright sunshine – around f/16
Slightly cloudy – around f/11
Overcast – around f/8
Heavy cloud – around f/5.6
Shade or sunset conditions – around f/4
The exact settings will vary depending on the scene, your camera and the effect you're trying to achieve, but understanding the principle can help you judge exposure without relying entirely on Auto mode.

Understanding Stops
You'll often hear photographers talk about changing the exposure by one stop.
A stop simply represents a doubling or halving of the amount of light.
For example:
Aperture:f/8 → f/5.6 = twice as much light
Shutter speed:1/250 → 1/125 = twice as much light
ISO:100 → 200 = twice the sensitivity
Understanding stops makes it much easier to balance your exposure.
If you open the aperture to let in more light, you might compensate by increasing the shutter speed. Alternatively, you could lower the ISO.
Once you start thinking in stops, adjusting your camera settings becomes much more intuitive.
Choosing Settings for Different Situations
Different photographic subjects often require different approaches.
Portraits and Blurred Backgrounds
If you want a soft, blurred background, try a wider aperture such as f/2.8–f/4.
Keep your ISO as low as practical and adjust your shutter speed to achieve the correct exposure.
Remember that a very wide aperture also creates a shallow depth of field, so focusing accurately becomes particularly important.
Sports, Wildlife and Action
Movement requires a fast shutter speed.
Something around 1/500 second or faster can be a useful starting point, although very fast subjects may require considerably faster settings.
If increasing shutter speed makes your image too dark, increase ISO or open the aperture to compensate.
Indoor and Low-Light Photography
Low-light situations often require some compromise.
Start by opening the aperture if possible. If you still need more light, increase the ISO gradually.
Try to avoid using an extremely slow shutter speed when hand-holding the camera, unless you deliberately want movement blur or you're using a tripod.
Learn the Rules – Then Break Them
Understanding exposure doesn't mean every photograph needs to follow a strict set of rules.
Photography is creative, and sometimes the most interesting images come from deliberately breaking the rules.
You might deliberately use a slow shutter speed to create movement, a high ISO to capture an atmospheric low-light scene, or a narrow aperture to create a distinctive look.
The important thing is to understand why you're making the choice.
Once you understand the Exposure Triangle, the Sunny 16 Rule, the Reciprocal Rule and the idea of stops, camera settings become much less intimidating.
You can move away from simply letting the camera make every decision and start making creative choices yourself.
The goal isn't simply to get the "correct" exposure. It's to understand your camera well enough to create the photograph you want.


Comments